Feeds:
Posts
Comments

>

Hi Everyone – I’m Back!  I’m not 100 % yet so I’ll be taking it slow these next few weeks while I heal.  Normally Fridays are reserved for my “Your Recipe- My Kitchen” posts but instead Im sharing this great recipe that I got from a friend of mine.
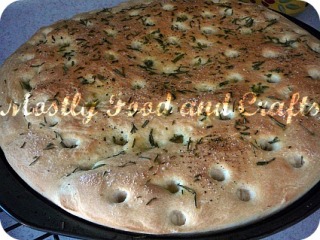
A good friend of mine gave me this recipe along with some fresh rosemary last summer and I have been making it ever since. It was seriously Love at First Bite!  I make this when its nice out, when I know we are going to be hanging out on the back deck with some cocktails and neighbors stopping by.  We use to cut this in to triangles like pizza but we decided it was a lot  more fun to just serve it whole and rustic, to just have everyone rip a piece off when they wanted some.  A lot of times we will put out dips or toppings with it; some fresh olives or pickled garlic (Publix has these in there olive bar and they are amazing!) a mixture of tomatoes, fresh herbs and olive oil, or maybe some cheeses.  Can you tell how I feel about this bread?  I have to admit, I made thisa couple of weekends ago for the first time since last summer and I was giddy at every step – I could not wait for it to be done.  I hope you Enjoy this as much as we do.
What you need:
(I always double this recipe)
For Dough
3/4 cup water
2 Tbsp olive oil
2 cups bread flour
1 Tbsp sugar
1 tsp salt
1 1/2 tsp bread machine yeast
For Topping
2 Tbsp olive oil
fresh ground pepper
Kosher salt 
2 Tbsp chopped rosemary
What you do:
Place all the dough ingredients in your bread machine according to your manufacturers directions.  Set to dough setting.
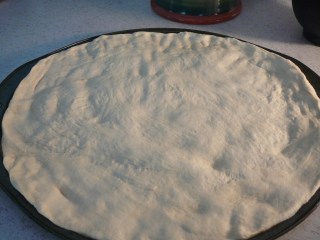
Grease a cookie sheet and pat dough into a 12″ circle.
Cover and let rise in a warm place for 30 minutes or until doubled.
Meanwhile, heat oven to 400 degrees.
Make deep impressions with the handle of a wooden spoon in the dough.  Drizzle and spread the rest of the topping ingredients on the bread.
Bake 15-18 minutes or until edges are golden
 our fresh herbs

>

Today I’m participating in the Ultimate Blog Swap. You’ll find me posting over at 12 Stone Dance about Cooking and Crafting with the Kids and I’m excited to welcome Amanda from Not Just Cute to Mostly Food and Crafts:
Farfalle Alle Erbe Panna Rosa AKA: “Butterfly Noodles”
I have three boys between the ages of 2 and 7.  It probably goes without saying that we have more than a few differing opinions about food in our home.  One likes most fruits, but when it comes to veggies, corn is out and so are carrots unless they’re raw.  Another readily eats meats and most veggies, but has explicitly informed us he does not like fruit!  The youngest will literally drink salsa, but the oldest is left in tears if he even catches sight of pepper.  And that’s just the kids.  I haven’t even mentioned my husband’s aversion to cheese and my own disdain for fish.  Surprisingly, there are a few meals that actually please everyone.  And this pasta dish in particular doesn’t just pass all the requirements, but it actually gets everyone excited about dinner timeFarfalle Alle Erbe Panna Rosa is a delicious dish you can serve to guests at a dinner party and look like a gourmet, but it’s also so easy you won’t hesitate to serve it up for your own family on a week night.
This dish can be made from fresh ingredients in summer time, or dry and canned ingredients in the off-season.  Fresh is delicious, but to be honest, I usually make the winter version just because it’s so much faster!
First off, your ingredients!  You’ll need:
1 lb farfalle (bowtie) pasta,
4 Tbsp butter
 1 tsp dry basil
 1/2 tsp dry rosemary
1/2 tsp dry sage
1/2 tsp. beef bouillon
 2 cans petite diced tomatoes
1/2 cup heavy cream
 salt and pepper
  (*Notes: If you want to use fresh herbs, just double the amount as dry herbs are more concentrated.  You can also use 2 lbs fresh ripe Roma tomatoes, peeled and cut into 1/4″ dice in place of the canned tomatoes.)
You can cook your pasta at the same time as your sauce, as it takes about the same amount of time to heat the water and boil as it does to cook the sauce, or you can wait until the sauce is done if you’re not so into that multi-tasking thing.
For the sauce:
Start by melting your butter in a large skillet.  Add the herbs and bouillon and stir for a minute or two.  Be very careful not to burn the butter! 
Add the tomatoes and about a teaspoon of salt.
Cook over medium-high heat for about 5-10 minutes, stirring frequently.  They’ll cook down and become darker in color.  You’ll know you’re ready for the next step when it looks something like this:
Now it’s time for the good stuff! 
CREAM!  (This is a healthy dinner if you stay focused on the lycopene…..not so much if you’re going for low-fat.  OH, but it is TASTY!) 
Stir frequently and cook over that medium-high heat until it’s well combined and has reduced a bit again.  Once your noodles are ready, toss the two together.  (And yes, I did scorch my wooden spoon.  Thanks for asking.)
Serve up with some freshly grated Parmesan cheese (unless your husband has an aversion to cheese).  It tastes great as-is or along with grilled chicken seasoned with the same herbs.
Butterfly noodles are always a hit when we’re learning about bugs and insects.  Sometimes I even cook up half butterfly noodles and half spiral noodles and call it butterflies and caterpillars.  Slide on over here to check out a full unit of ideas for playful learning with a bugs and insects theme!
*A few sneaky time-saving tricks:
*Measure out your herbs into a plastic bag and store those along with your canned tomatoes and pasta in your pantry.  (I put it all in a bin with the recipe.)  Then grab your other ingredients from the fridge and you’re ready to rock!
*You can follow the steps up until the tomatoes have reduced, then transfer to a crock pot to keep warm.  Once you’re ready to “make” dinner, return it to the skillet, add the cream and you’ll be ready in just a matter of minutes.
*If you want your pasta fresh but ready in a hurry, cook it until it’s about half-way done.  Drain and rinse in cold water then toss with oil.  Keep in an air-tight container.  When you’re ready, put your pasta in a steamer basket and dip into boiling water again and it will be ready – and fresh- in a snap!
Thank You Amanda – My kids would defiitely devour this dish!
Visit Life…Your Way to see all of the Ultimate Blog Swap participants!


>

I originally didn’t plan on posting this but my followers are awesome!  And have always given me a sense of encouragement so I thought I would share.  This week  I won’t have my usual Friday  “Your Recipe – My Kitchen” post and Saturdays “What I Bookmarked This Week” won’t be up either.  Hopefully you will all start seeing some posts again from me real soon – just hang out and wait – because I’ll be back soon. 
I have had a crazy two weeks healthwise, and tomorrow morning I will be going in for surgery first thing in the morning.  I’m pretty sure things will turn out fine and I will be back at my keyboard in no time.  I just wanted to update everyone in case you were looking for my posts.

>

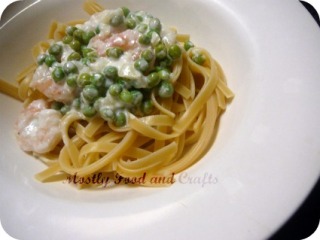
This was a total surprise dish.  By a surprise dish what I mean is I didn’t expect to love this.  I know that sounds weird but its true!  Here’s the background:  I got my Kraft First Taste coupon in the mail for the new Philadelphia Cooking Creme so I went out and bought it (because I can’t pass up free right?)  I chose the Savory Garlic Cooking Creme and brought it home, put it in the fridge and there it sat and sat…  Fast forward a little while and I need a quick meal, I had a pasta dish in mind for dinner that night and went to grab the ingredients and they were not here – ugh!  I opened the fridge to come up with another plan and this container was begging to be used.  So, I grabbed it.  When I say I didn’t expect to like this dish much , what I’m really saying is we are kind of pasta snobs in this house (I admit it we are.)  We don’t buy jarred sauce unless its going in lasagna and then maybe we’ll use some.  I can make a great sauce real fast like my go to quick pasta sauce recipe. Or an unbelievable, let it cook all day amazing pasta sauce like this one So, I was skeptical – I was so wrong!  This was great and when Hubby walked in from work and sat down to dinner he kept asking what was in this amazing sauce (he is a bigger pasta snob than I am so he was doubly shocked.)  Enjoy!!
What you need:
1 lb shrimp, frozen cooked cleaned and thawed (I used medium)
1/2 -1 cup frozen peas, thawed (I went overboard on the peas – I lost my grip on the bag)
2 tsp olive oil
1/2 cup chopped onion
black pepper
1/4 cup milk
1 tub Philadelphia Savory Garlicky Cooking Creme
What you do:
Heat oil and cook onions about 3-4 minutes.  Ad the peas and cook while stirring 4-5 more minutes.  Add your shrimp, pepper and milk and cook and stir for about 3 minutes or until the shrimp are heated through.  Add the creme now and continue to cook and stir for another couple of minutes.  You can add pasta liquid to thin if you need to.
Serve over fettuccine.
Linking up here

>

I’m going to  try to share my weekly bookmarks with you.  These are recipes I want to try or projects that have inspired me.  Here are a few from this week I hope they inspire you as well:
I have a new button on my sidebar – if you have been bookmarked on my site be sure to grab one.
Normally when it comes to breakfast, I am not a huge fan of the sweet stuff (pancakes, french toast etc…) I love a good omelet though.  But, I saw this recipe over at Smitten Kitchen and I think I could definitely switch up my morning breakfast for some crème brûlée french toasts.
 creme brulee french toast
I have another breakfast recipe that I bookmarked, how good does this sound?  It’s a Cheesy Bacon Apple Frittata.  This recipe is from Family Fresh Cooking.  It doesn’t just sound good – it looks good too…
Healthy, high protein, low fat frittata recipe on Family Fresh Cooking.
Check out this Chocolate Chip Cookie Dough Cheesecake from Katie’s Cucina (I think I gain a pound or two every time I read the recipe)  its look so good!  I am just waiting for a special occasion so I can attempt this.
I love this Recipe Holder from Lil Luna, I am working on something similar for my teacher gifts this year (stay tuned).
This is just too stinkin’ cute!  Check out these adorable Changing Faces Toilet Roll Dolls from A Little Learning For Two. I love them – and my kids will too!!
I will end with something different today.. I will leave you with a cocktail – lets kick off the weekend now – shall we?  Hubby and I love a good Manhattan – its one of our favorite drinks.  I found this recipe yesterday for The Voodoo Manhattan Cocktail on Food Republic – the reason it’s so special – it is the Winner of the Ultimate Manhattan Bartender Contest

These are few of the many things in the blogosphere that have inspired me this week – what has inspired you??

>

Its Friday!  That means it’s time for another Your Recipe- My Kitchen Post. 
  This recipe is from one of my first “What I Bookmarked This Week” posts.  I was excited when I first saw this recipe for Cherry Banana Bread with Nutella Swirls from On and Off My Plate.  But then, like a lot of my bookmarks, I forgot all about it.  Well, the other day I looked over at my bananas and they were pretty much saying “use us now or we are done!”  I planned on my making my usual Banana Bread  when I remembered this recipe.  I didn’t make it exactly the same, I didn’t have the cherries in the house but mine was great and I don’t think I am going to be able to go back to regular banana bread ever again.  Enjoy!
What you need:
3 small ripe bananas, mashed
1/2 cup brown sugar
1/2 cup low fat sour cream
1/4 cup butter, melted
2 eggs
2 cups all-purpose flour
1 t. baking powder
1/2 t. baking soda
1/4 t. salt
1/2 cup Nutella
What you do:
Combine first 5 ingredients in a large bowl; beat at medium speed of an electric mixer until well blended. Combine flour and next 3 ingredients; Add flour mixture to banana mixture, stirring just until moistened.
Spoon 1/2 batter into a loaf pan coated with baking spray. Drop in  1/4 cup Nutella in dollops. Swirl a bit then top again with remaining batter. Add the rest of the Nutella in dollops on top. Swirl again.
Bake at 350º for 1 hour and 5 minutes or until a wooden pick inserted in center comes out clean. Cool on a wire rack.
Be sure to check out On and Off My Plate for the Cherry Banana Bread as well as some tips on making this with yogurt instead of sour cream..

Linking Up Here

>

I have been saving this recipe for you for a while now mainly because it is a terrible picture of a very tasty pizza we created.  I thought since I will be announcing the Freschetta Giveaway winner at the end of this post it was only appropriate to finally share one of our favorite pizza recipes with you now.  This is a BBQ Chicken Pizza and it is a very quick throw it all together type of meal.  Enjoy!!
What you need:
about 2-3 cups Shredded Chicken, you can use some leftover chicken for this recipe or rotisserie chicken.  You can also cook up a few breasts or thighs and shred them before making this
Refrigerated Pizza Crust
1 cup Your favorite BBQ Sauce
2 cups Mozzarella Cheese, shredded
1 cup Frozen Corn, thawed
1 medium (or 1/2 large) red onion, sliced thin
What you do:
Heat oven to 425 and unroll pizza dough on a lightly greased cookie sheet.  Start from the middle and spread out dough evenly.  Bake for about 7 minutes or until dough sets a bit. 
At this point I sauteed my onions a bit but you can leave them raw if you prefer. 
Remove Crust from oven, top with BBQ sauce, onions, chicken, corn and sprinkle cheese over top.
Return to oven and cook until heated through and cheese has melts, about 8-10 minutes.  Slice and serve.
Some other pizzas we have created  in the past are; Taco Pizza and an Upside Down Pizza.
And now for the winner of the Freschetta Giveaway!
Congratulations to:
  Anonymous said
mmmmm pizza! I like all kinds of veggies.
I will be e-mailing you soon – congratulations on winning some free pizza and a storage set from Freschetta.
Linking up Here
                                                 

>

I’m going to  try to share my weekly bookmarks with you.  These are recipes I want to try or projects that have inspired me.  Here are a few from this week I hope they inspire you as well:
I have a new button on my sidebar – if you have been bookmarked on my site be sure to grab one.
This Chicken and Black Bean Green Enchilada Bake from Picky Palate  looks great!  I love a casserole/one pot dish.  This caught my attention because it had all the ingredients that I know my kids would love too; rice, chicken, olives, cheese and beans …these are few of our favorite things…
Here is a recipe from food 52 that I literally stumbled upon, I love when that happens, you know- someone tweets something and you follow, read it and find something linked to it – you get what I’m saying right?  That’s how I found this recipe for Mujaddara with Spiced Yogurt, it is a very simple lentil dish but it looks sooo good!
Mujaddara with Spiced Yogurt
And now for dessert – I have bookmarked another recipe from Sugar Plums blog this week.  Are you ready for it?  OK – it is a Hot Fudge Chocolate Bundt Cake.  Hubby never reads my blog so if anyone runs into him will you please let him know that I want this for Mothers Day!!!
Bundt2
I’ll take these too!  Actually Hubby might prefer these.  This is a recipe from the amazing Ree Drummond.
It’s another delicious chocolate dessert recipe, Ree calls these Knock You Naked Brownies (hence the Hubby reference earlier). 
Have you seen these amazing Jewelery Holders yet?  I know they are all over blogland this week, but I had to bookmark them too!  I love this idea from Peace, Love, 2 Sisters.
I found these “Book Shelves” today and I LOVE them!!  I am definitely going to give this a try.  Aren’t they great and so smart?  This idea is from Masons Roost.
Here is a great Jute Calendar that Charcoal and Crayons made.  I love how this came out.  It looks like a lot of work and I am hoping I have the patience to give it a try because I think it is awesome!
I normally only feature 3 bookmarks in each category (Food and Crafts) but this week I found so many amazing ideas out there!  Here is the last craft I found and I think this is a great idea for Mothers Day – I know I wont be able to make one and send it out to my Mom by Sunday, but her birthday is coming up soon so I may make this for her then (she never goes on-line so I think my secret is safe.) It is an adorable Mothers Day Bracelet from At Second Street

I have to tell you – I am sitting in the kitchen typing this post and all I can think about is the amazing aroma coming from my oven right now.  I am making a Banana Nutella Bread from one of my first “What I Bookmarked” posts and I can’t wait to share it with you. 

I wanted to wish everyone a very Happy Mothers Day!!! 

And lastly, if you haven’t yet entered my Freschetta Giveaway make sure you do.   You can win a coupon for some free Freschetta by the slice and a 3 pack food storage set.

These are few of the many things in the blogosphere that have inspired me this week – what has inspired you??

>

Its Friday!  That means it’s time for another Your Recipe- My Kitchen Post.  I am so excited to share this recipe from Gina’s Skinny Recipes.  This recipe is for Slow Cooked Pernil or Puerto Rican Pork and it is AMAZING!! Seriously, I am telling you run out and get the ingredients now, throw this in your slow cooker tomorrow, eat it tomorrow night and be completely amazed at all the flavors in this skinny dish.  I liked this a lot – can you tell?
I served this tasty pork with rice and beans and a homemade coleslaw.
The next day I mixed all the leftovers together and served them in corn tortillas.  Enjoy!!
Here’s what you need:
3  lb pork shoulder blade roast, lean, all fat removed
4-5 cloves garlic, crushed
1 tbsp coarse salt
1/2 tsp oregano
1/2 tbsp cumin
1/4 tsp crushed black pepper
3 juiced oranges
2 juiced limes
Here’s what you do:
Use a knife to cut slits into the pork and stuff  the holes with half of the crushed garlic. Combine the rest of the ingredients and pour over pork. Place in the ceramic part of the crock pot, cover and refrigerate, turning pork occasionally and leave overnight.
The next day,  cook on low for about 8 hours.
After 8 hours, remove pork and shred using two forks.
 Remove liquid from crock pot and add pork back to crock. Add about 1 cup of the liquid back and adjust salt, pepper and cumin (you will probably need to add more). Let it cook another 15-30 minutes.
Be sure to stop by Gina’s Blog and check out her amazing recipes – I’m there quite often.

>

We made some really cute flowers in a vase for Little Mans preschool teachers.  BUt they would be great Mothers Day flowers as well. My plan was to make the teachers some tissue paper flowers and call it a day but when we went to grab the paper we only had green.  You can’t make green flowers!  SO we quickly grabbed a few supplies and threw this together.  I say quickly because I didn’t even stop to grab my camera (I know what was I thinking?)  I think I can recreate this for you – it was a lot of fun to make with my little man.
First we grabbed some TP rolls (because I have way too many of these lying around the house waiting to be crafted with.)  We then chose some cardstock and covered the TP rolls with it. 
For the flowers, I actually had some flower pieces of paper lying around but you could easily cut some out of paper yourself.  We cut the leaves out of different shades of green paper.  I didn’t have any green pipe cleaners in the house so I looked through my stash of “stuff” and I actually decided to use green paintbrushes for the stems.  Sweet Girl had a birthday party at Michael’s this year and we gave out goodie bags filled with art supplies, I have a lot of paintbrushes left over from this. 
I stuffed some green tissue paper inside the tubes and pushed the brushes through it just to hold them in place. 
When you are done go ahead and embellish however you like.  We added cute little flowers to the front and wrote “Thanks for helping me to grow” – I attached these with some mini paper clips.
I think my Little Man was excited to give these to his fabulous teachers – what do you think??
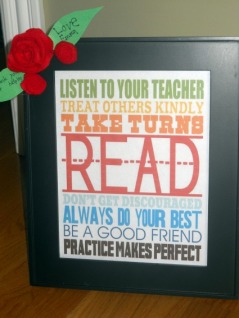
Sweet Girl gave her teacher this printout I got from eighteen25.
We added a fabric flower to the frame and used the same “Thanks for helping me to grow” saying and wrote it on the flower leaves.
I was happy with our gifts and I think the teachers really liked them.
Linking up Here